
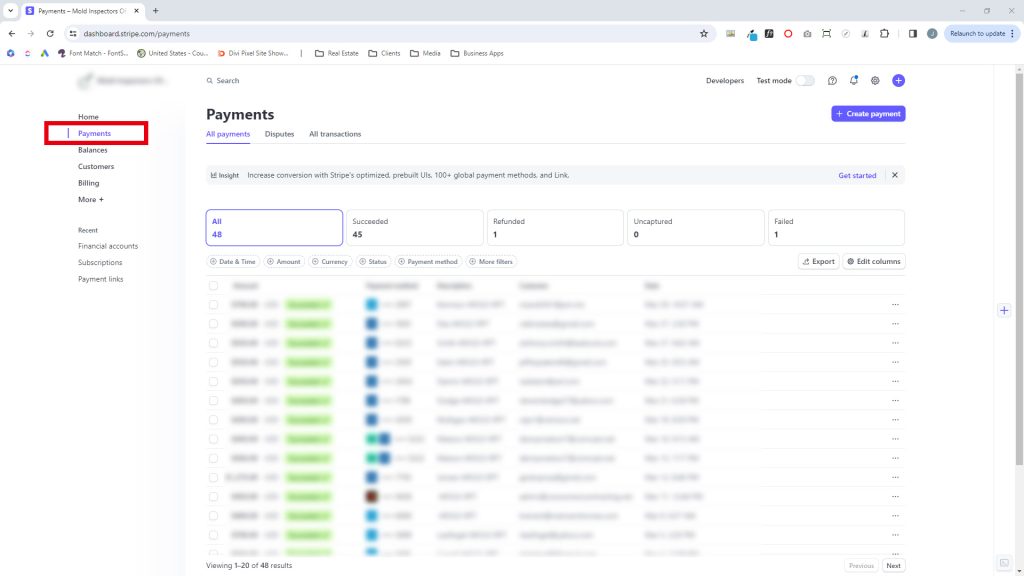
1. Log Into Stripe, Select Client, & Select the Payments Tab
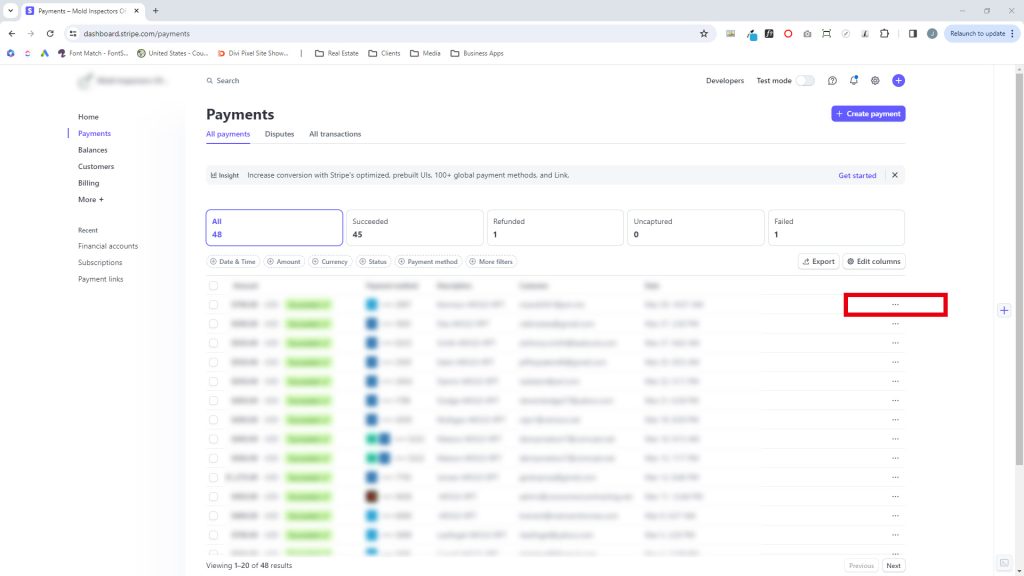
2. Click the Three Dots to the Right of the Client/Customer You Want to Refund (•••)
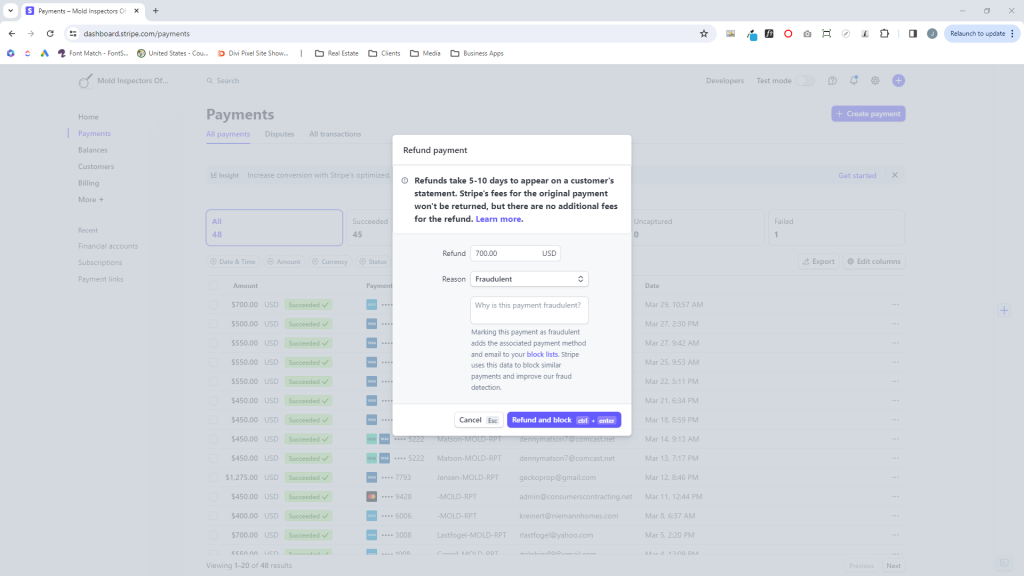
3. Select "Refund Payment," Provide the Amount & Reasoning, & Submit
That's it! You've completed a successful Stripe refund as easy as 1...2...3!
How do I switch between interacting as myself (personal profile) and interacting on my company (business page)? There are a couple of places and ways to change how or who you are as you interact on Facebook. We will review them below:
From a Business Page:
Log in to your Facebook account and navigate to the business page you want to interact on behalf of. You can switch between profiles using the drop-down menu that currently shows the company icon.
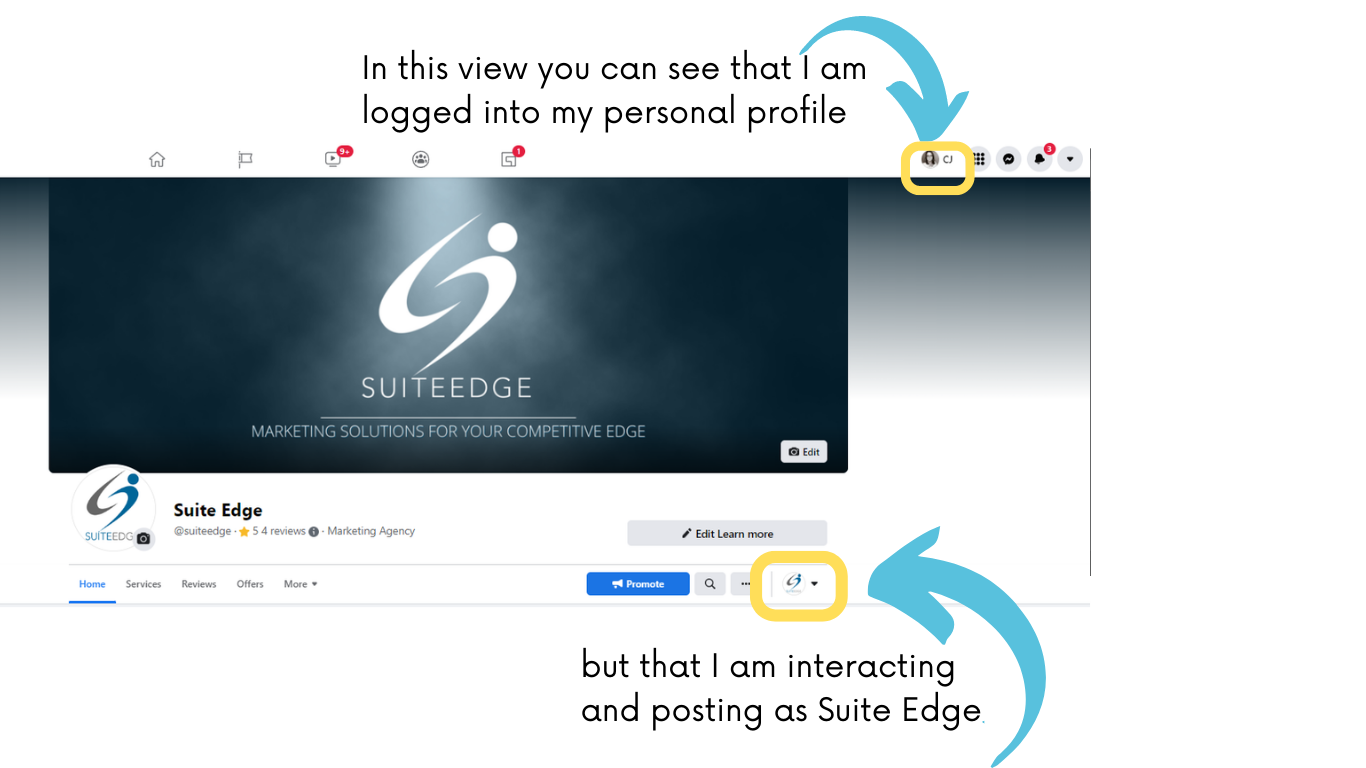
From the Newsfeed: (Apple Devices Only)
Scroll through your Facebook newsfeed. Then, click the downward arrow next to your profile picture and select who or how you want to interact.
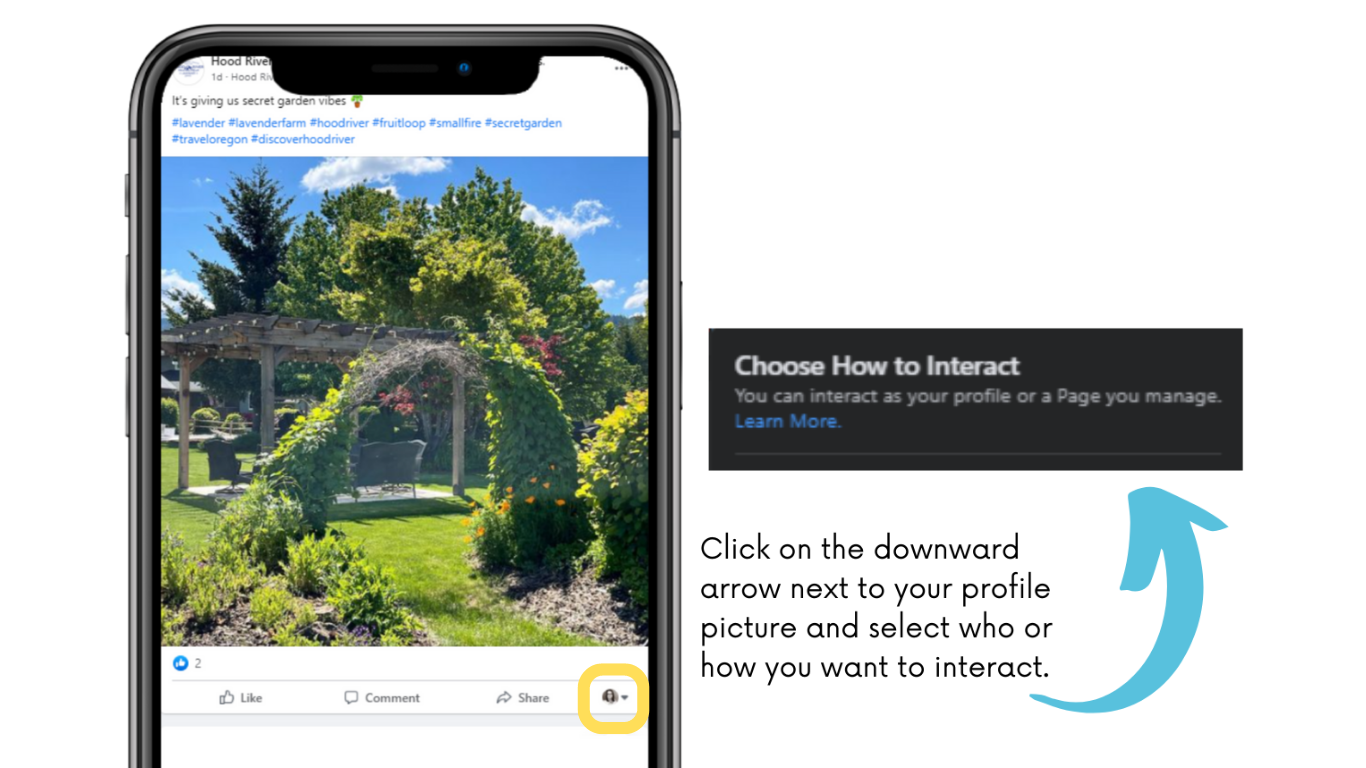
Update: Facebook is releasing a New Page Experience throughout 2022 that will allow Android users to use this functionality as well.
At The Top or for the New Page Experience:
Scroll through your Facebook newsfeed. Click the downward arrow next to your profile picture and select who or how you want to interact. The "New Page Experience" is gradually being released by Facebook. Eventually, all "Classic Pages" will become "New Pages"
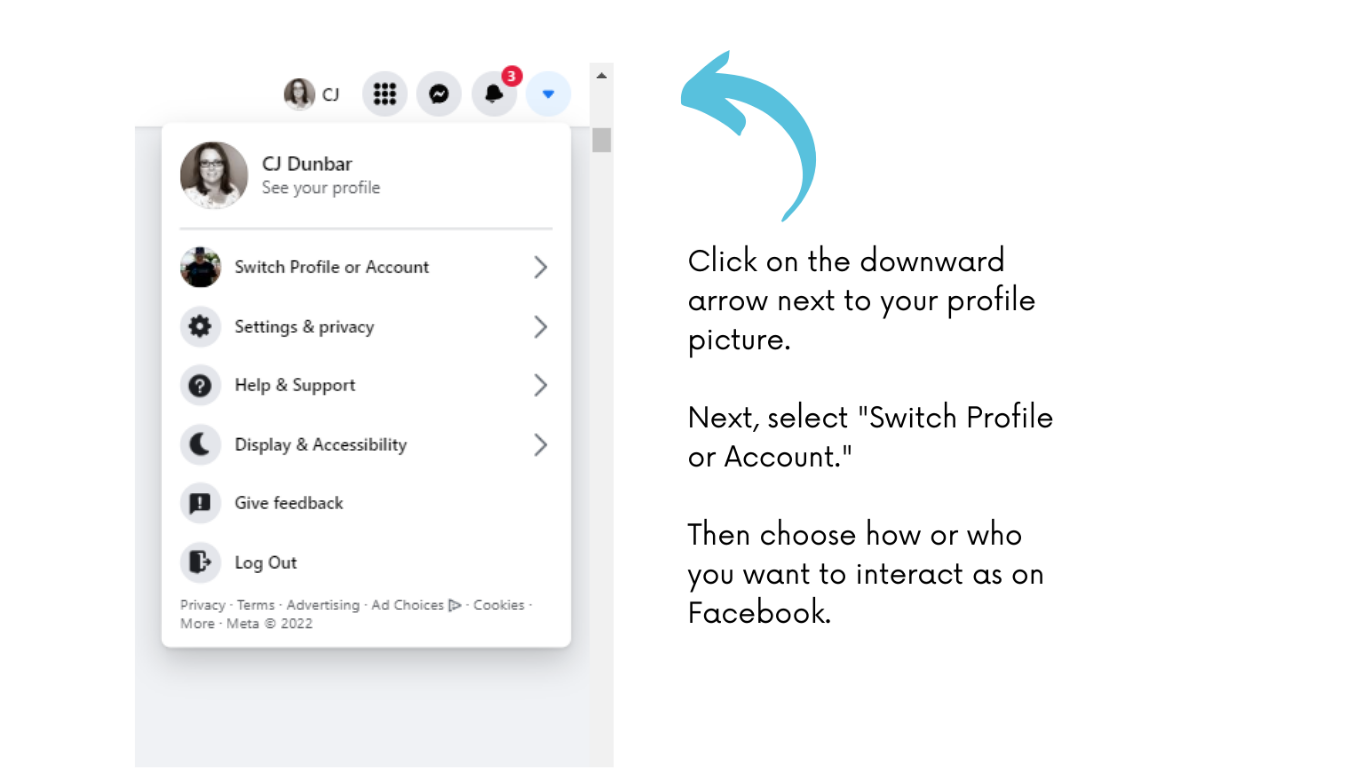
That's it...you are now a master at switching between and interacting as your personal profile or a business page on Facebook!
Due to recent changes at Meta, having a Facebook and Instagram account is no longer enough for a business to effectively use these social channels. As such, Meta now requires a Facebook Business Account. This process is well worth the few minutes it will take to complete using the steps below. It is also necessary to allow us as an agency to assist you with your social media postings, ads, pages, pixels, shops, and job listings.
How do I know if I have a Facebook Business Account and not just a business page or personal profile?
Step 1: Log in to your Facebook account and determine if you already have a business account.
Step 2a: If you already have a Facebook Business Account, you can proceed to our help article HOW TO: Add Suite Edge to Your Facebook as an Agency Partner.
Step 2b: If you do not yet have a Facebook Business Account, continue with the steps outlined below:
Let's dive into helping you set up your Facebook Business Account.
Step 1: Go to https://business.facebook.com/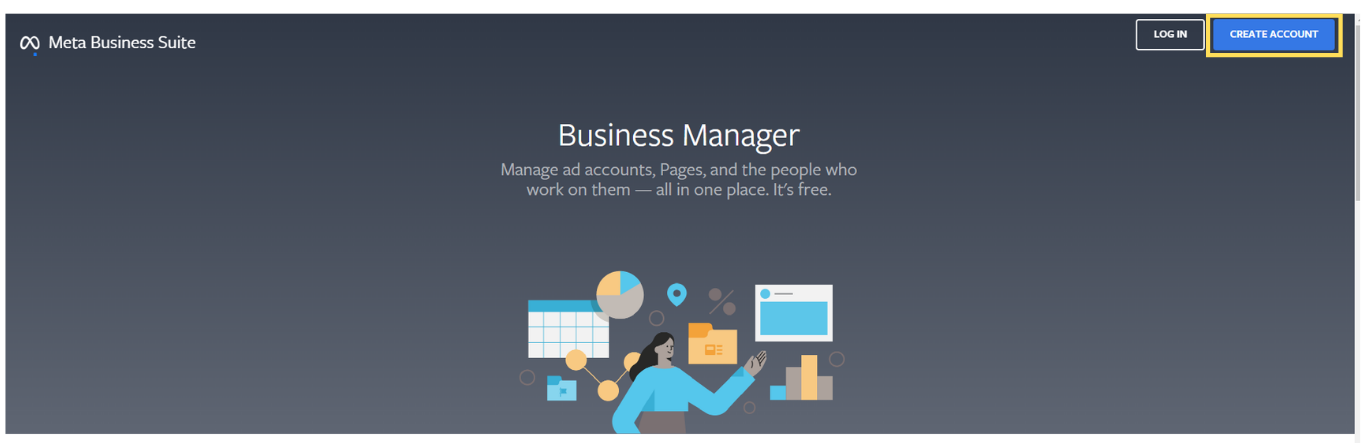
Step 2: Click "Create Account", log into your personal Facebook account (if requested), and enter in the required business information. You will be required to verify your business email address.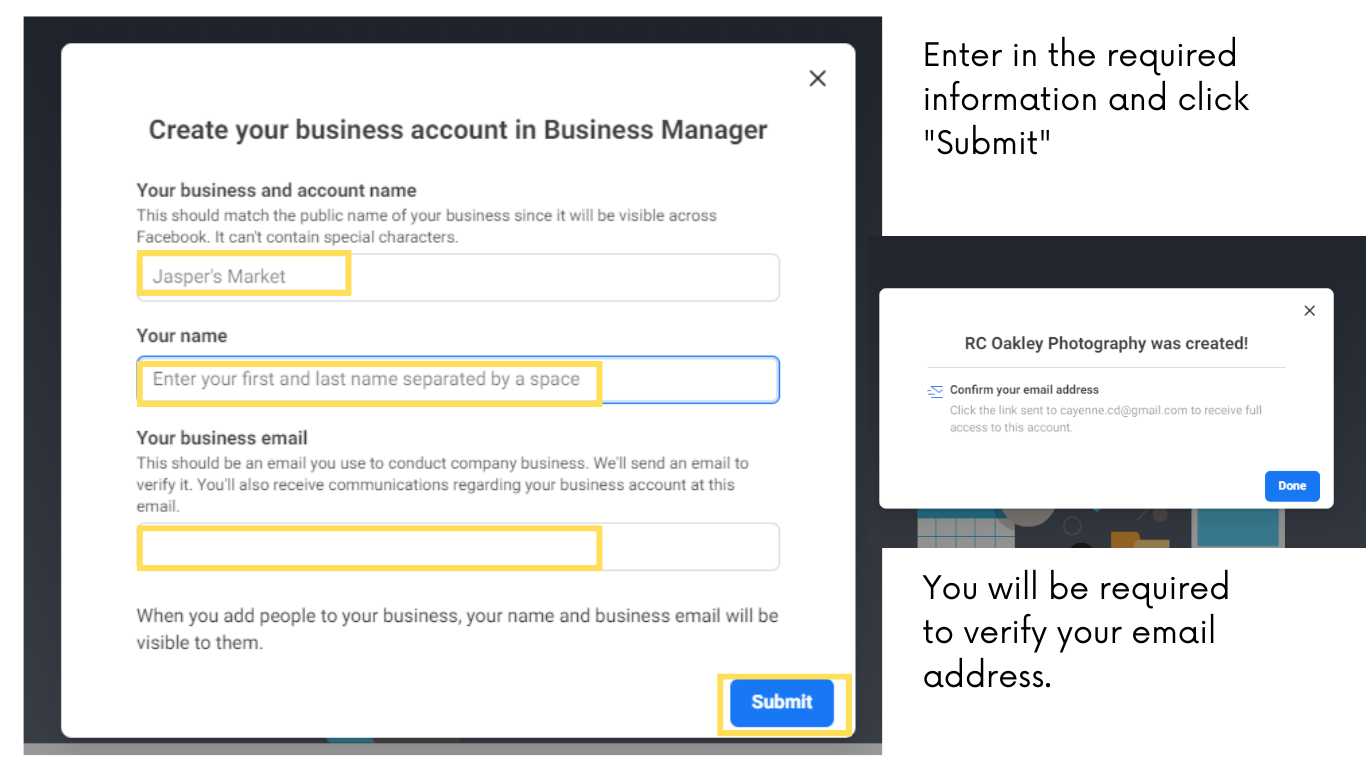
That's it! You should now have a personal profile, a business page, and a business account. Please proceed to our help article HOW TO: Add Suite Edge to Your Facebook as an Agency Partner. Once you have completed those steps, Suite Edge will be able to provide you with the best service possible within the new Meta features and requirements. Thank you for assisting us in getting things set up for success.
In order to best serve you, Suite Edge needs to be added as an Agency Partner in your Facebook Business Manager. This process is well worth the few minutes it takes to complete the steps below.
Step 1: Log in to your Facebook account.
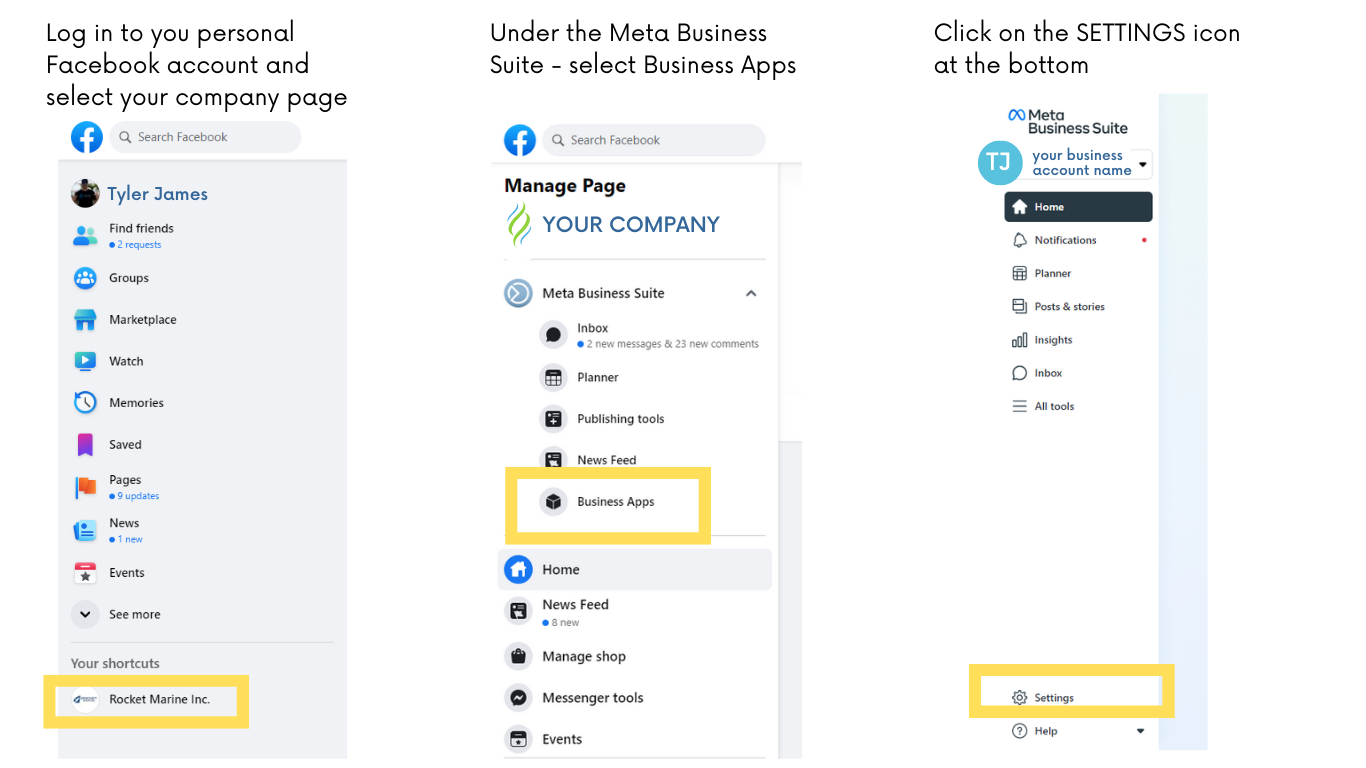
Step 2: Go to Business Settings.
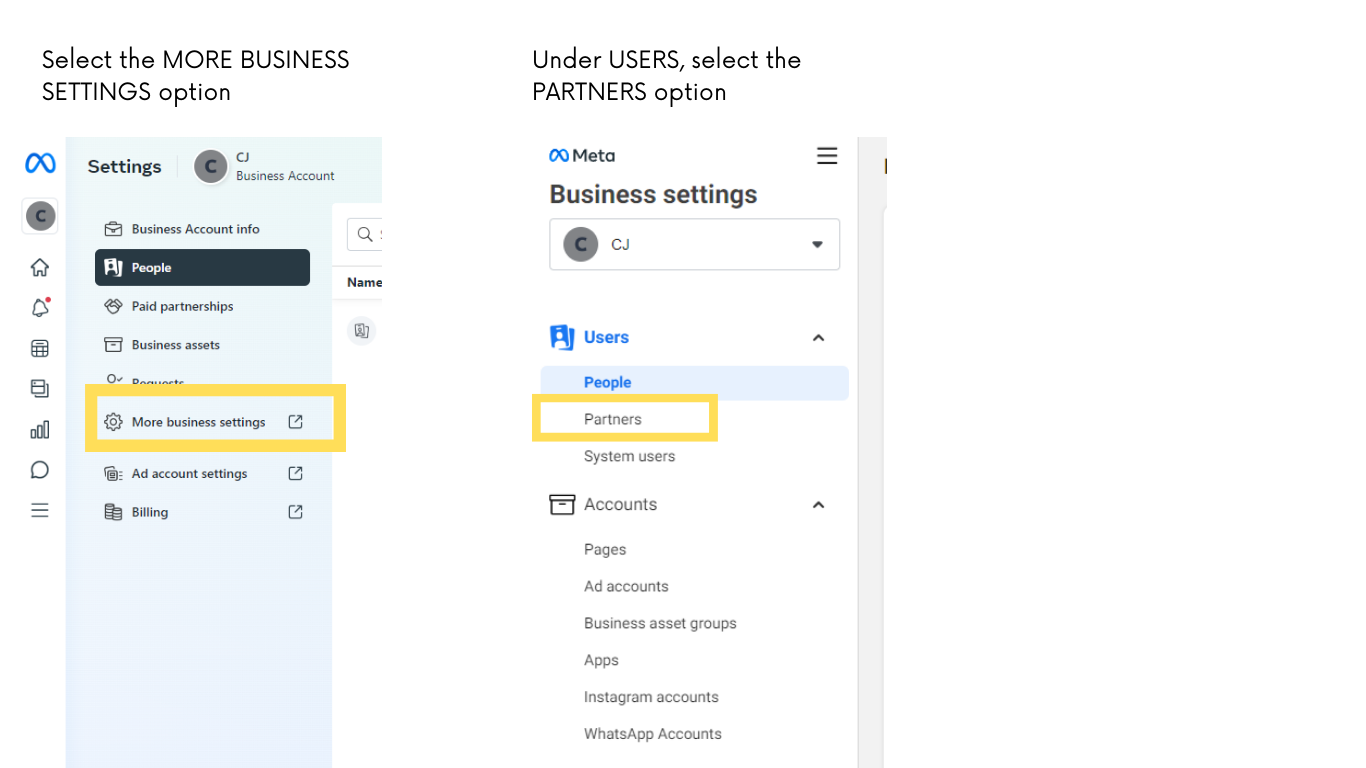
Step 3: Below User... click Partners
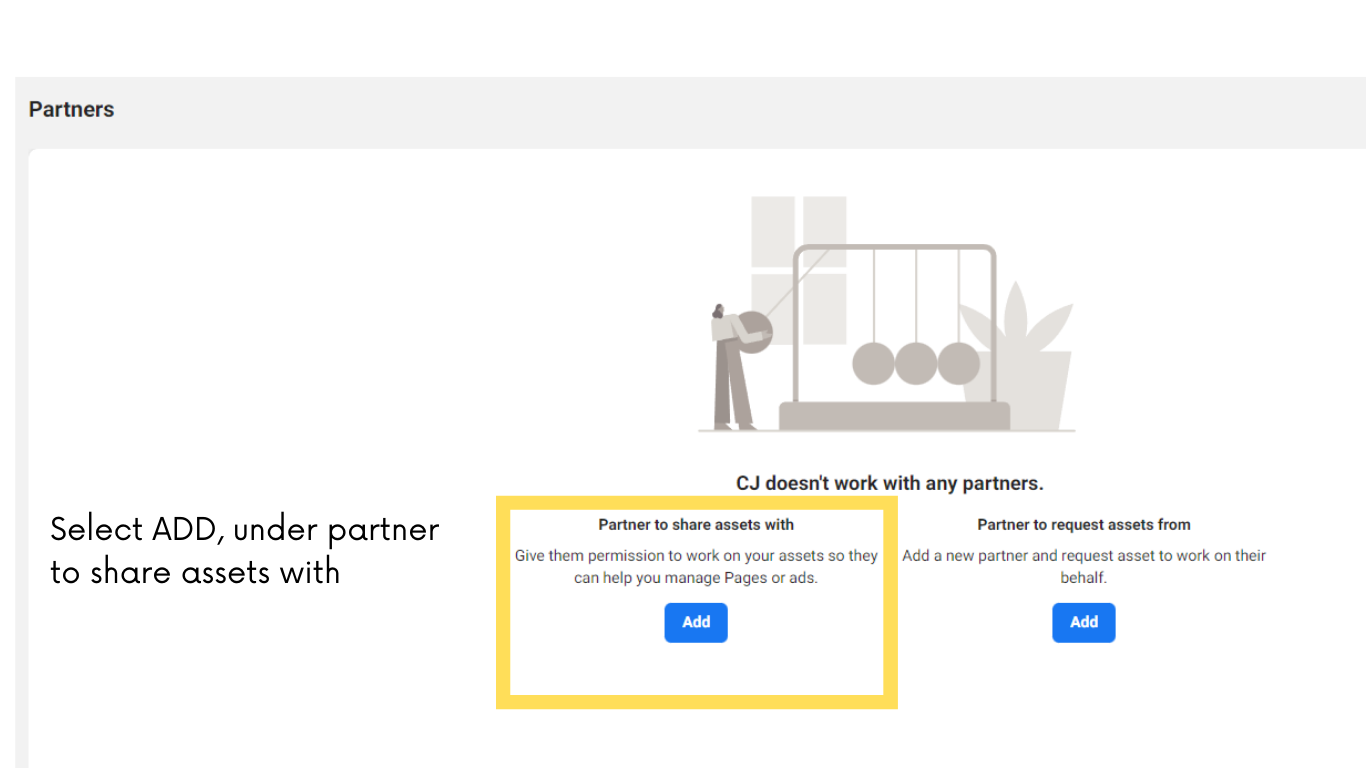
Step 4: Select add under "Give a partner access to your assets"
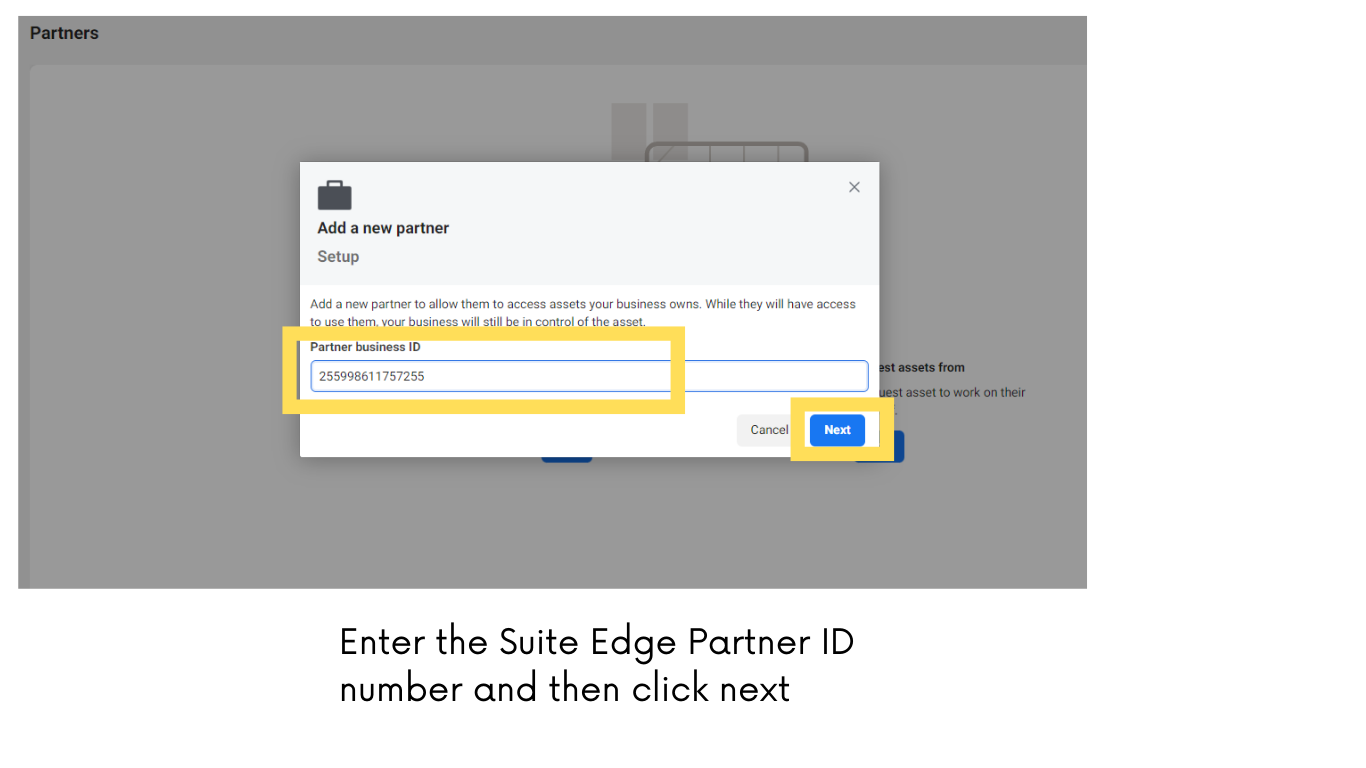
Step 5: Enter the Partner business ID you want to add and click Next.
Suite Edge Business ID: 255998611757255
Step 6: On this screen, you can add partners to multiple assets.
- Classic Pages (required)
- Instagram Accounts (required)
- Pixel (required)
- Ad Accounts (optional - unless you would like Suite Edge to be able to advertise on your behalf now or in the future)
- Catalogs (optional - unless you have items to post in your online shop)
Step 7: Select the asset and the access you want to assign the person. To effectively assist you, we need the “Facebook Access,” "Admin Access," or 'Full Control" permission depending on the asset selected.
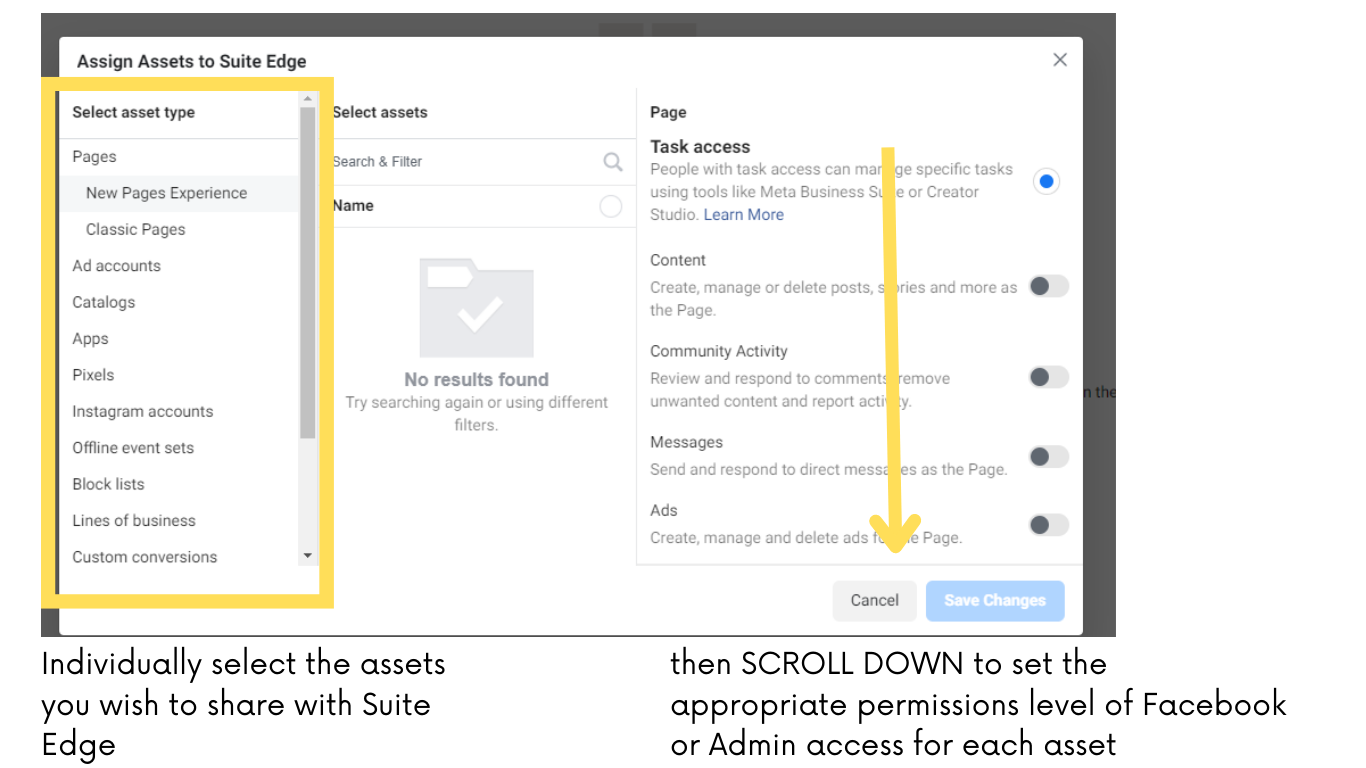
Step 8: After all assets in your business have been shared with Suite Edge....Click "Save Changes"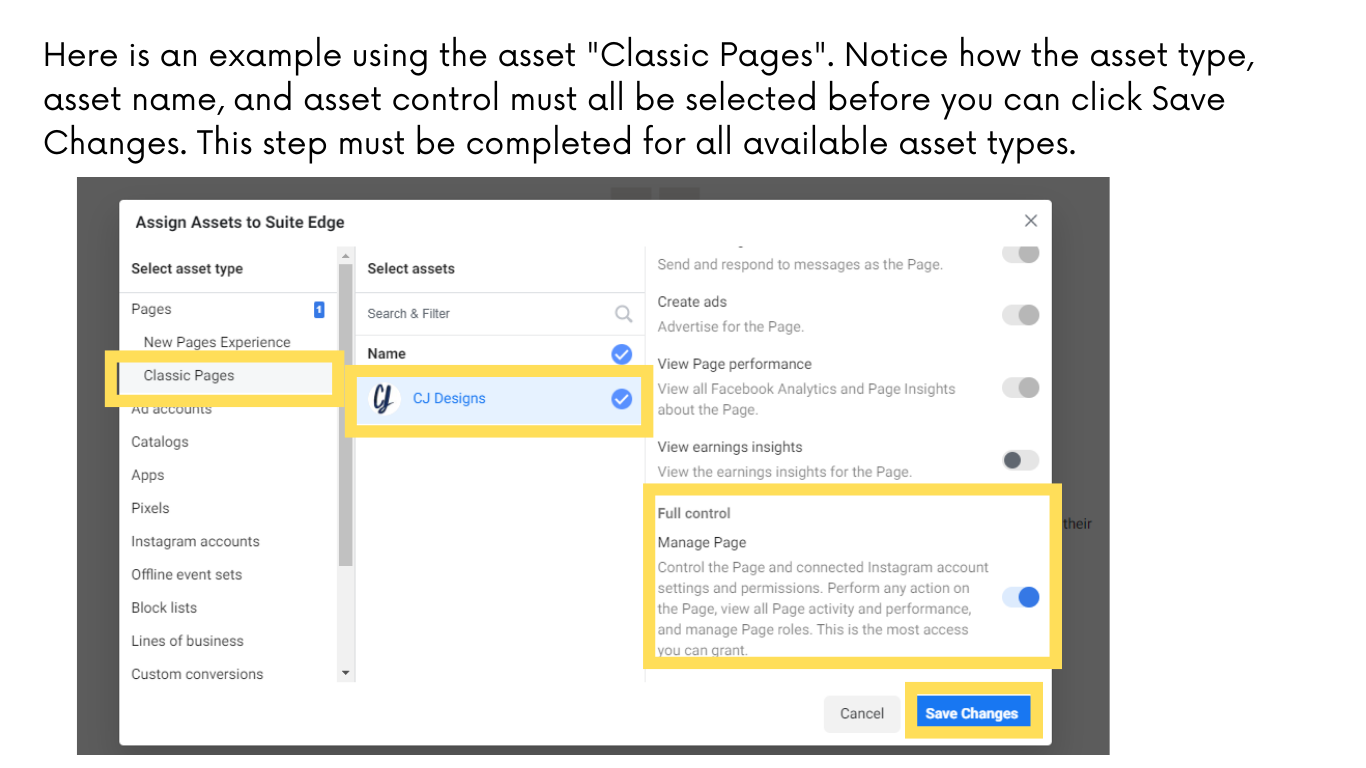
That's it! Suite Edge connected. We are now able to provide you with the best service possible as we manage your digital marketing and social media! Thank you for assisting us in getting things set up for success.
Have you ever needed to add admin to your LinkedIn Page? If so, we can help! To best assist you and support your company's success, Suite Edge needs Super Admin access to your LinkedIn company page.
LinkedIn Page super admins can add, edit, or remove content roles and other administrative features on the LinkedIn company page. As part of setting up the LinkedIn company page a Super Admin role is assigned to the creator of a Page. Only a Super Admin can add another Super Admin.
Here are a couple of essential things to note….
- Super admins will receive admin requests through their Activity tab and can view pending requests through their Admin tools.
- If you're the only super admin on the Page, you must assign another super admin before removing yourself.
With that background as to what a Super Admin can do and why they are needed – let's get down to business and walk through the how-to of adding a Super Admin to your LinkedIn company page.
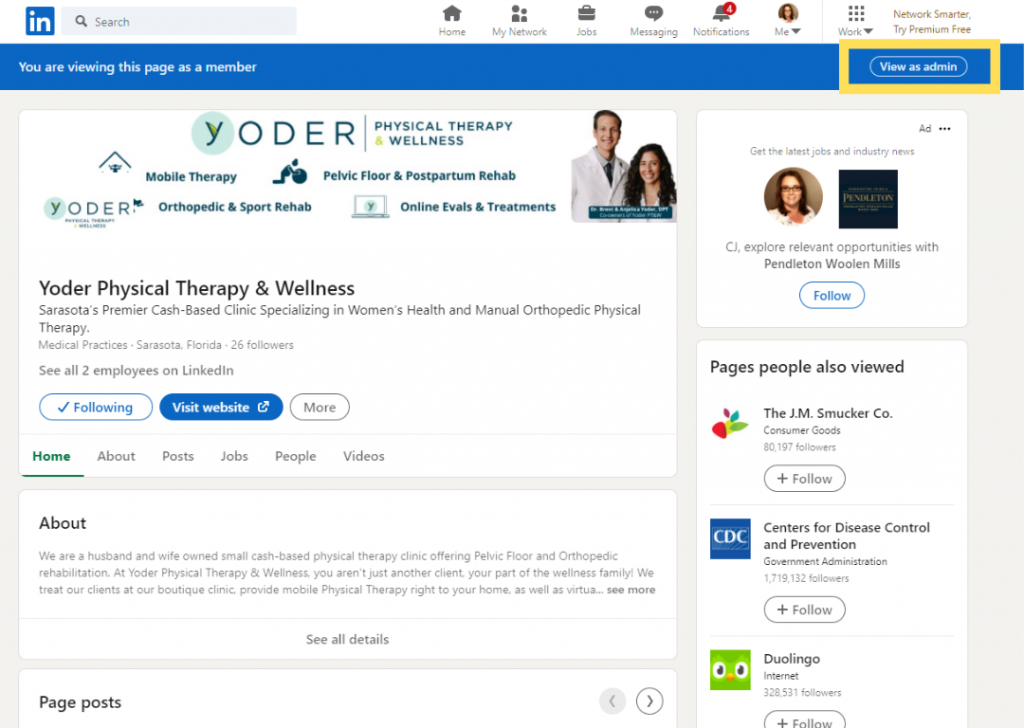
Step 1: Access your Page using the Super Admin view.
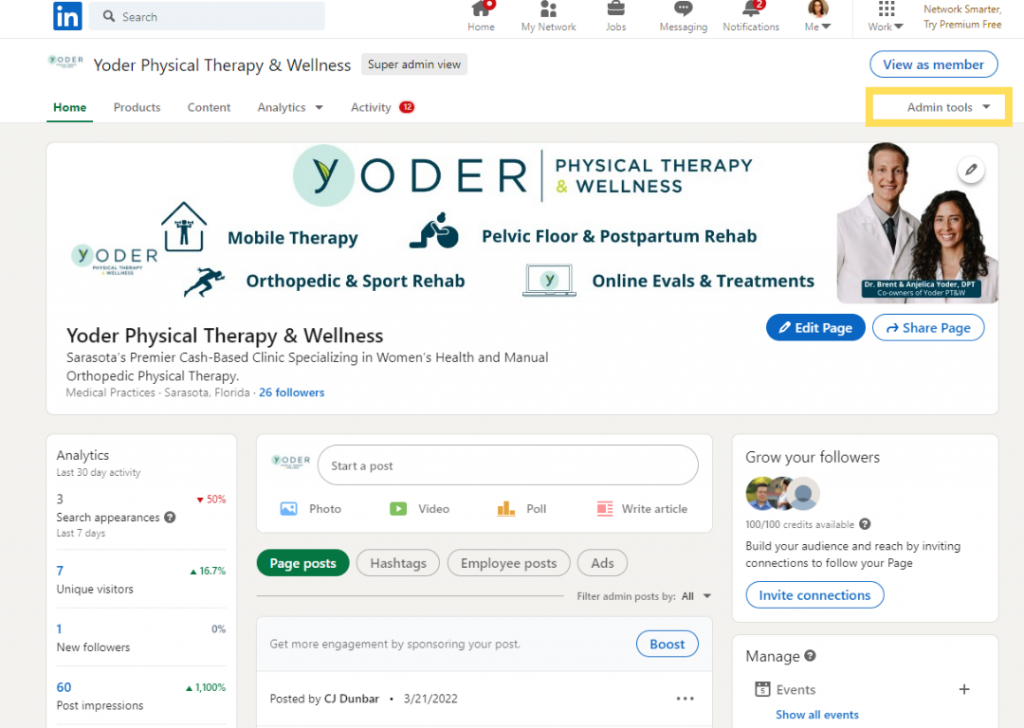
Step 2: Click the Admin tools dropdown at the top of the page and then select Manage Admins.
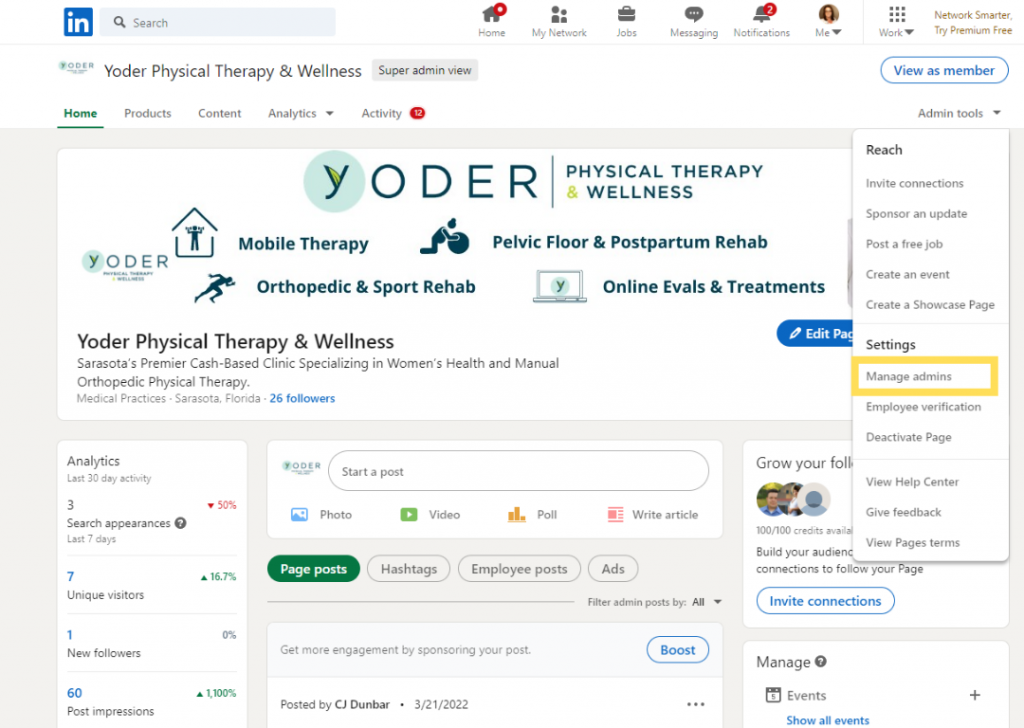
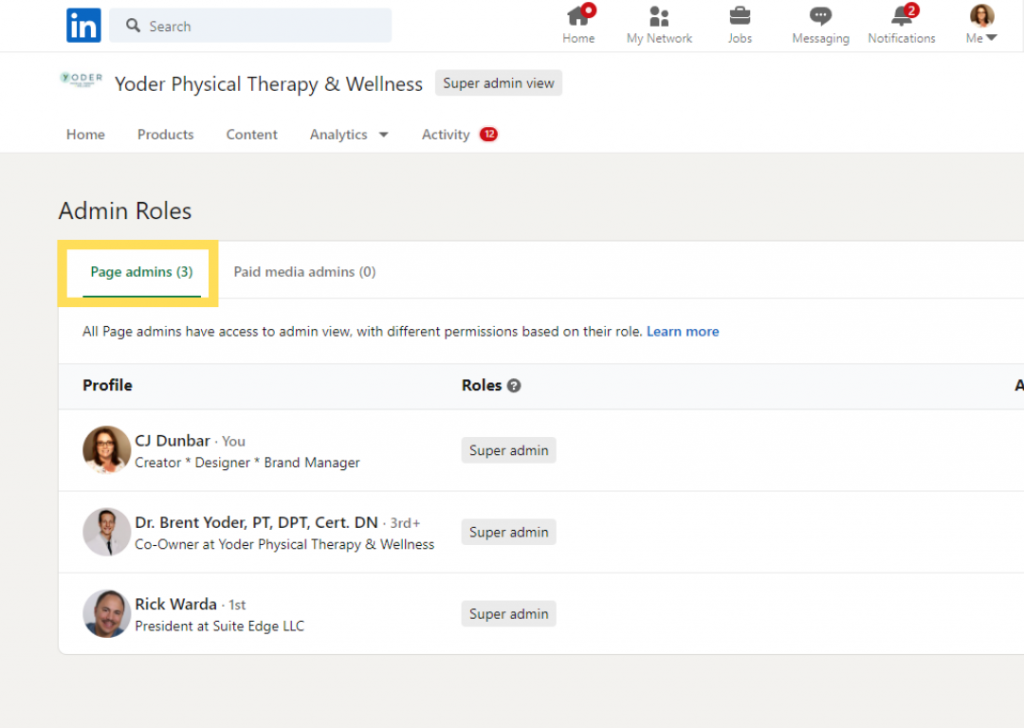
Step 3: Click the Page Admins tab.
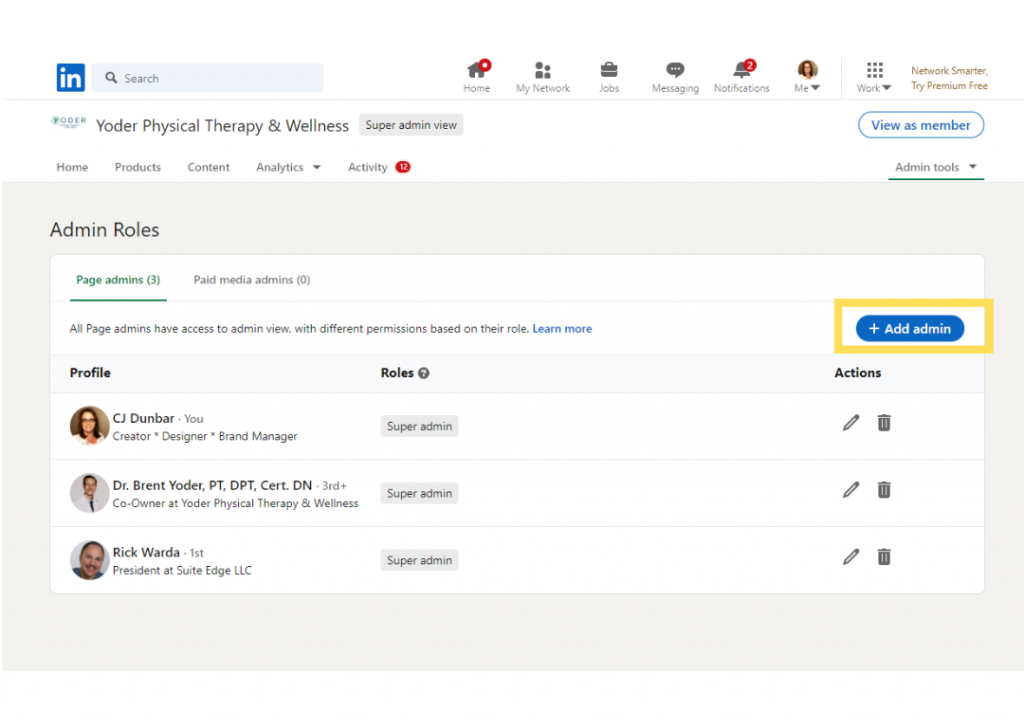
Step 4: Click the Add Admin button.
Step 5: Add the requested Suite Edge Brand Manager(s) to your account as a Super Admin by typing the name of the individual you'd like to add in the "Search for a member" text field.
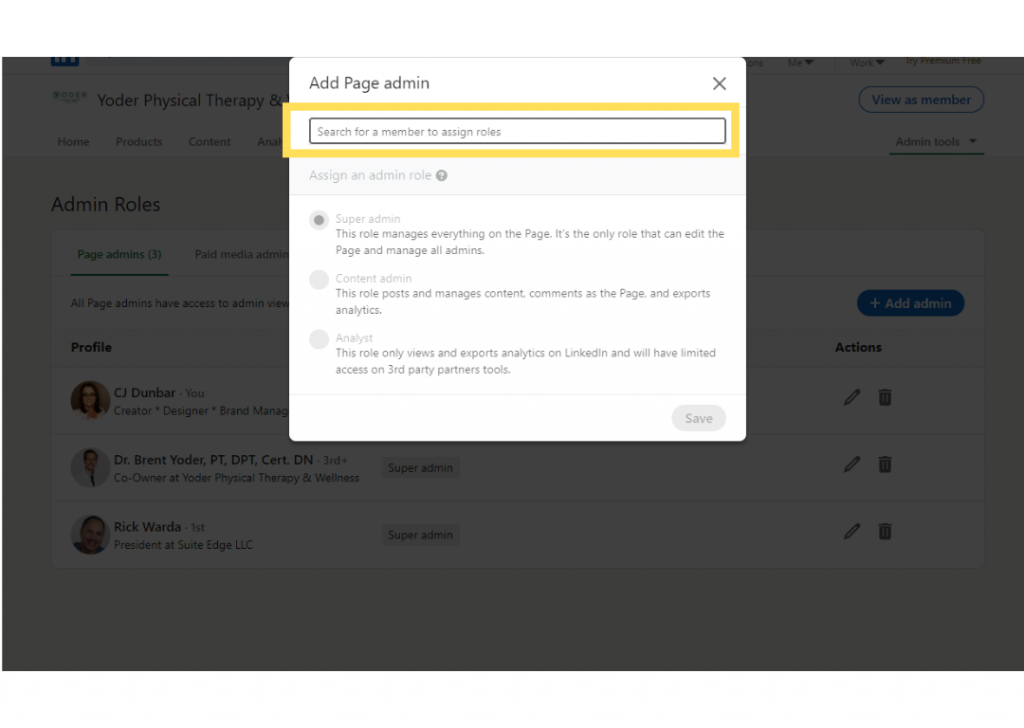
Step 6: Click the member's name from the menu that appears.
Step 7: Select the Super Admin role.
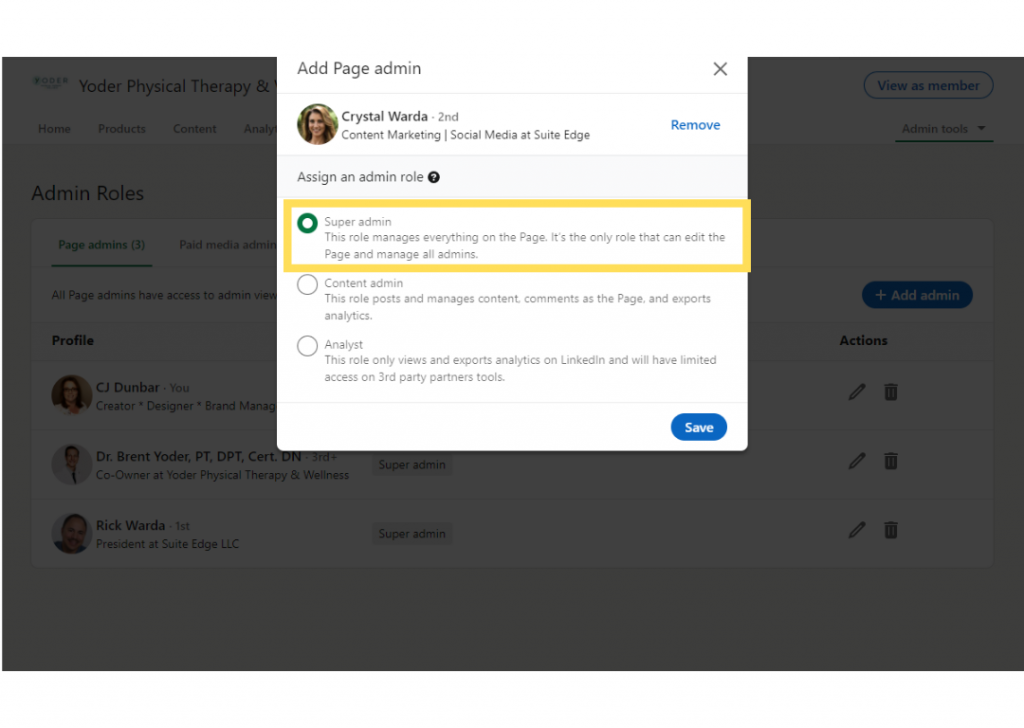
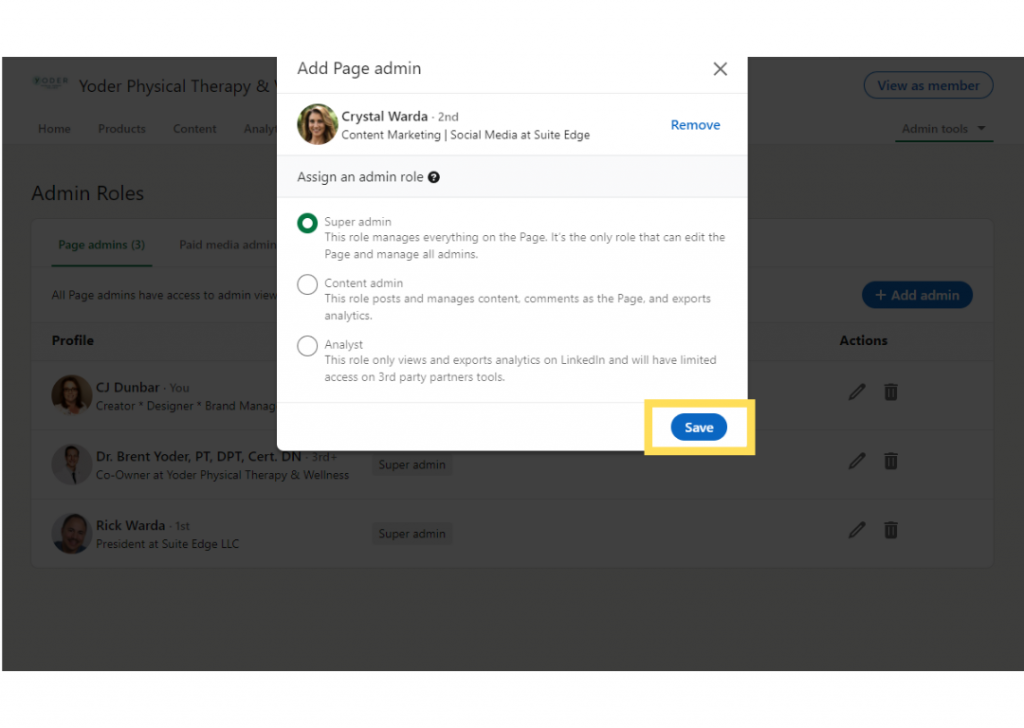
That's it! It was simple and seamless. You have successfully added a Super Admin to your company page on LinkedIn. For other great how-to articles, check out the rest of the Suite Edge Knowledge Base. At Suite Edge, we are here to support you as we work together to make your business famous!
Adding Google mail to your iPhone is a simple process. Apple has included a streamlined method for doing such. So, follow along with the steps below, and you'll be up and running in no time!
Step 1:
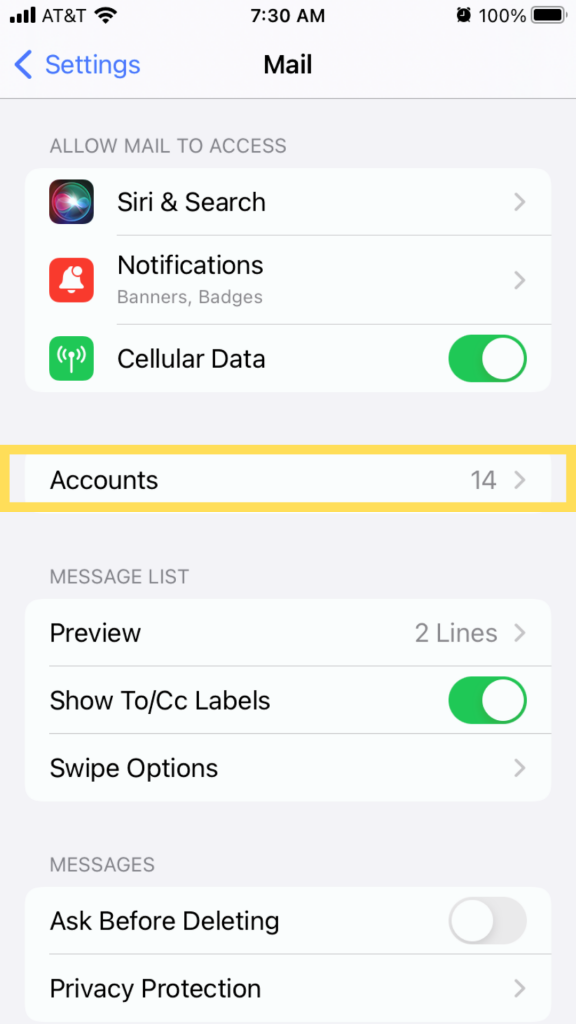
On your iPhone, go to Settings. Select Mail, then tap Accounts.
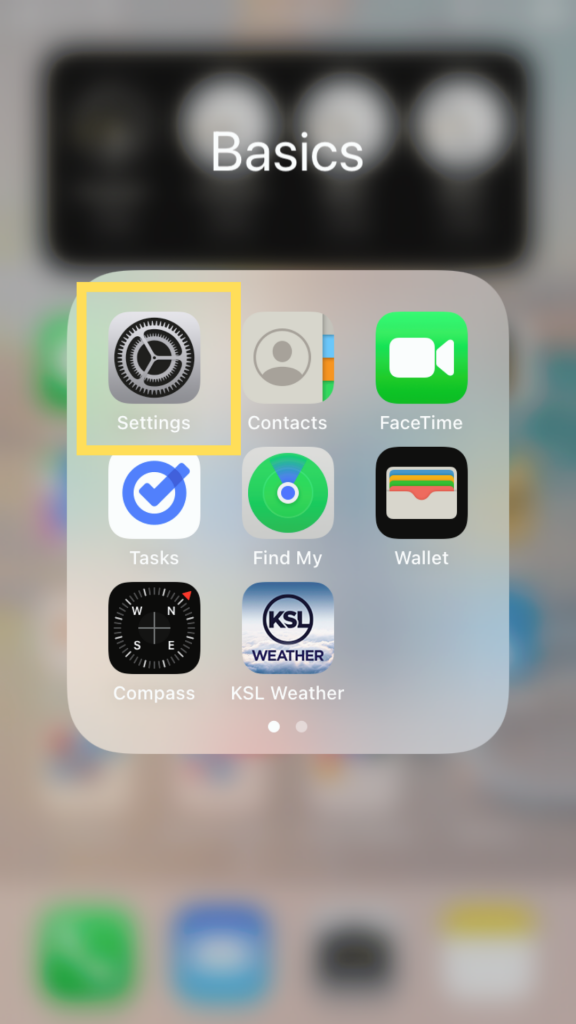
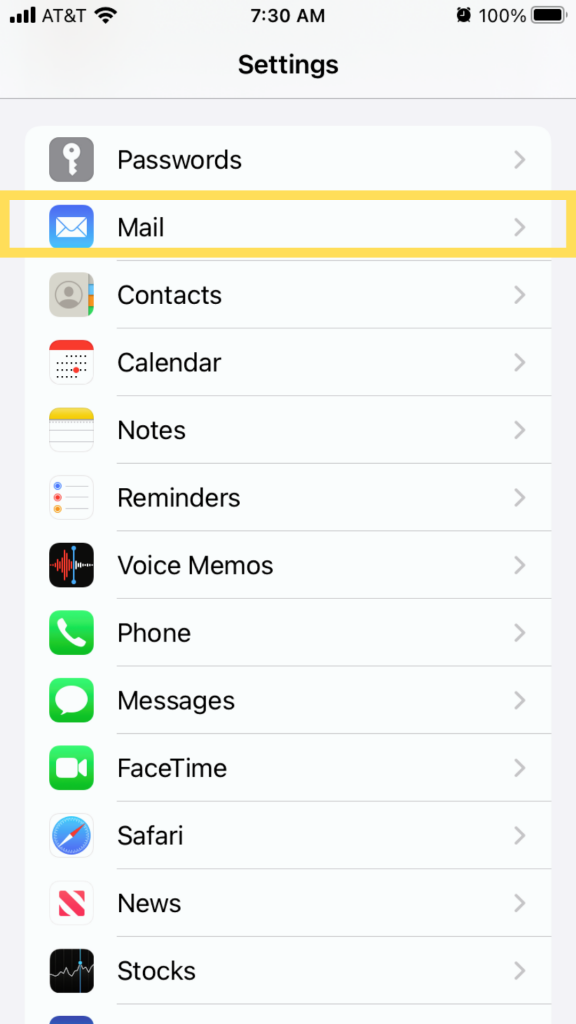
Step 2:
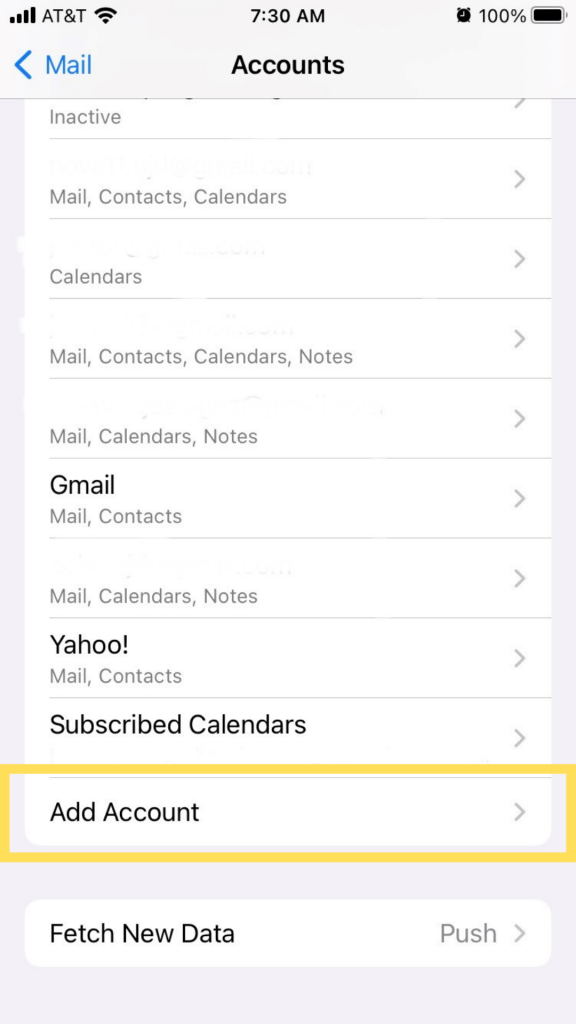
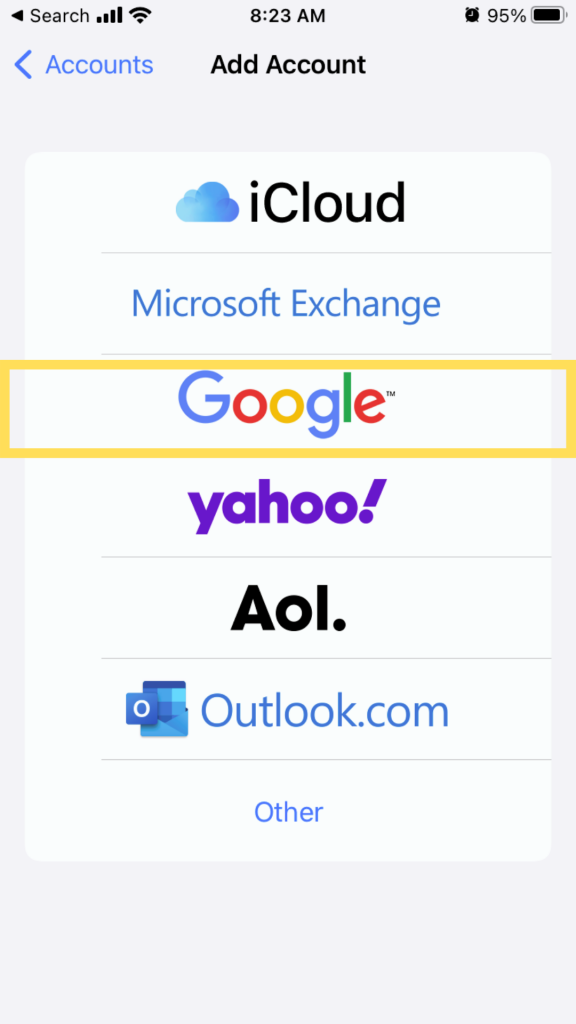
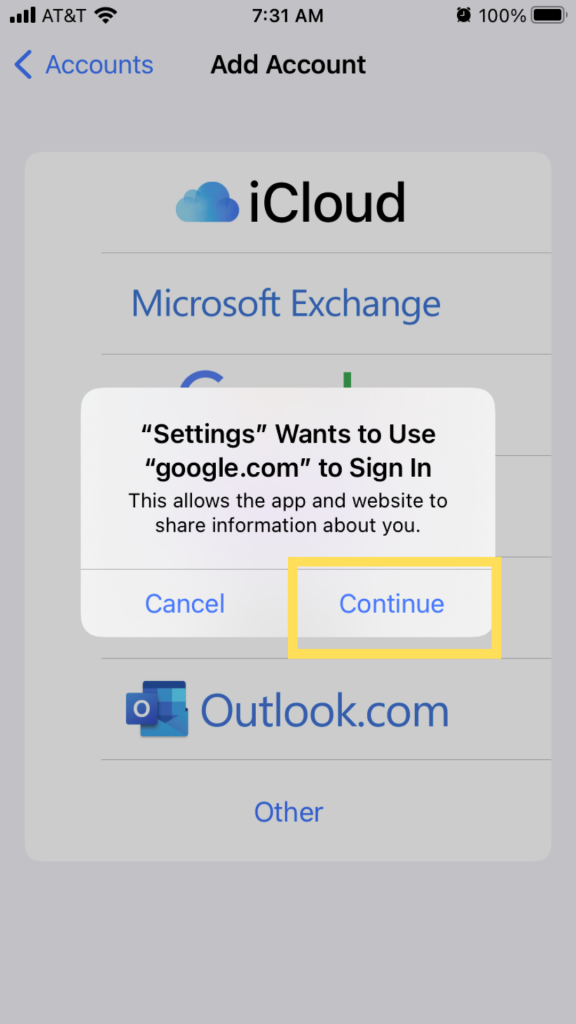
Tap the Add Account button and then select Google as your email provider.
Step 3:
Type in your email address and password as prompted.
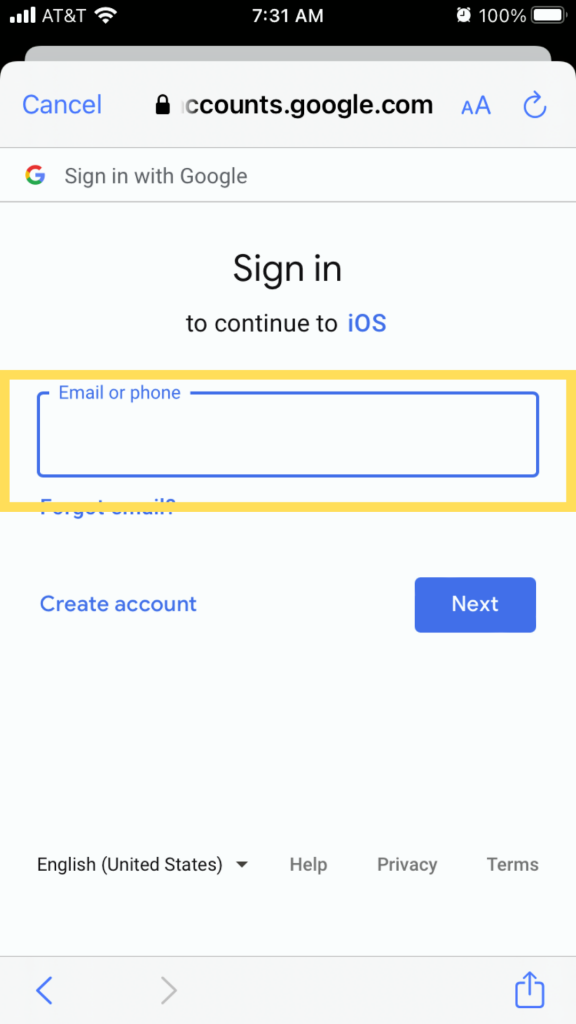
Step 4:
Tap Next. Wait a moment as Mail verifies your account.
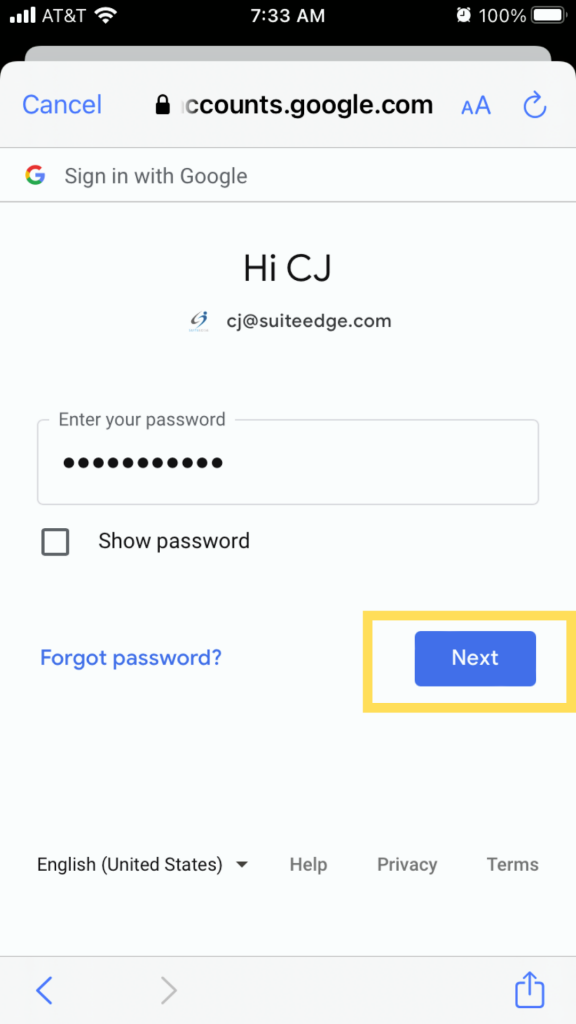
Step 5:
Scroll down and tap Allow.
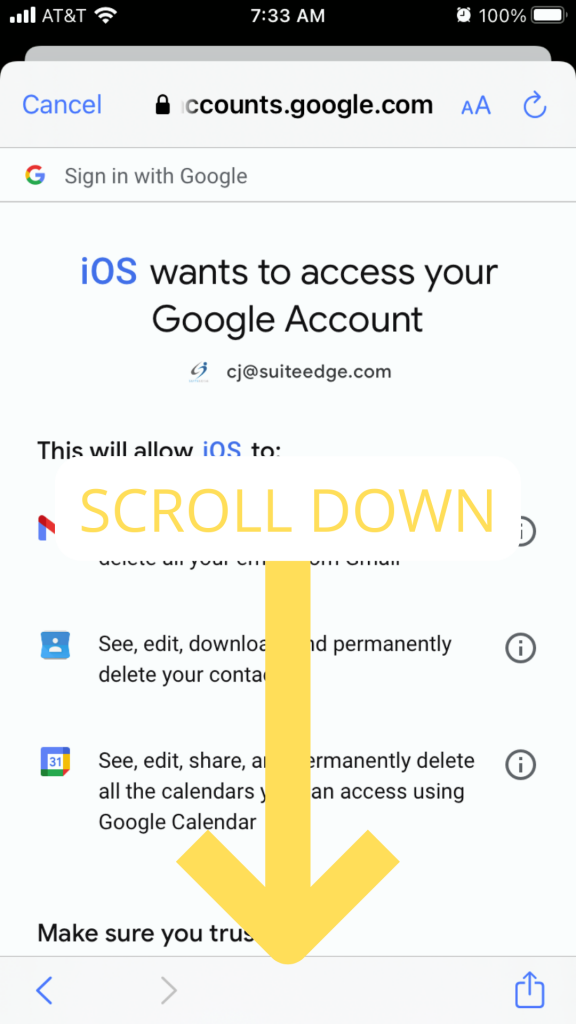
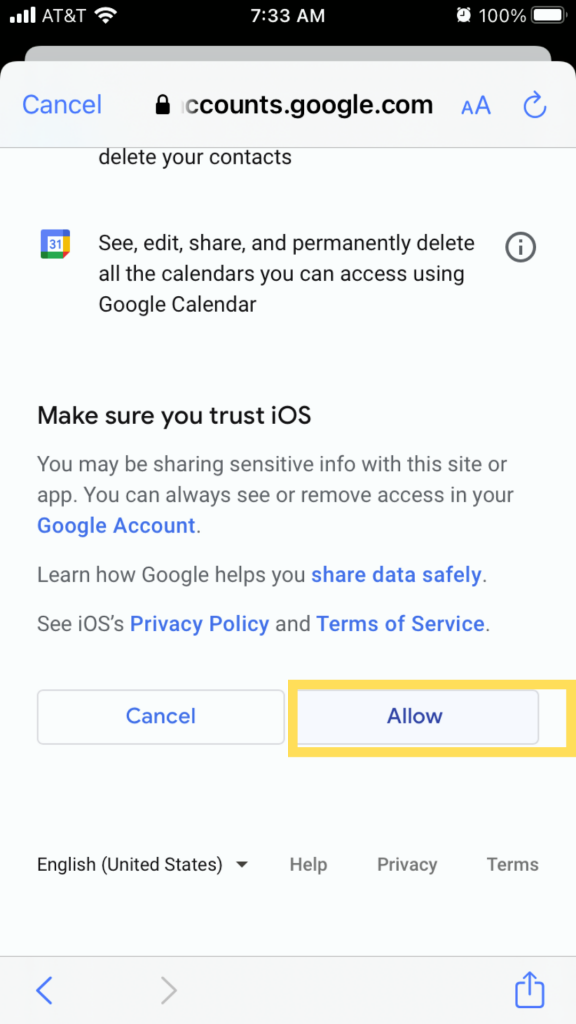
Step 6:
Choose the features you would like to sync to your phone. Tap Save.
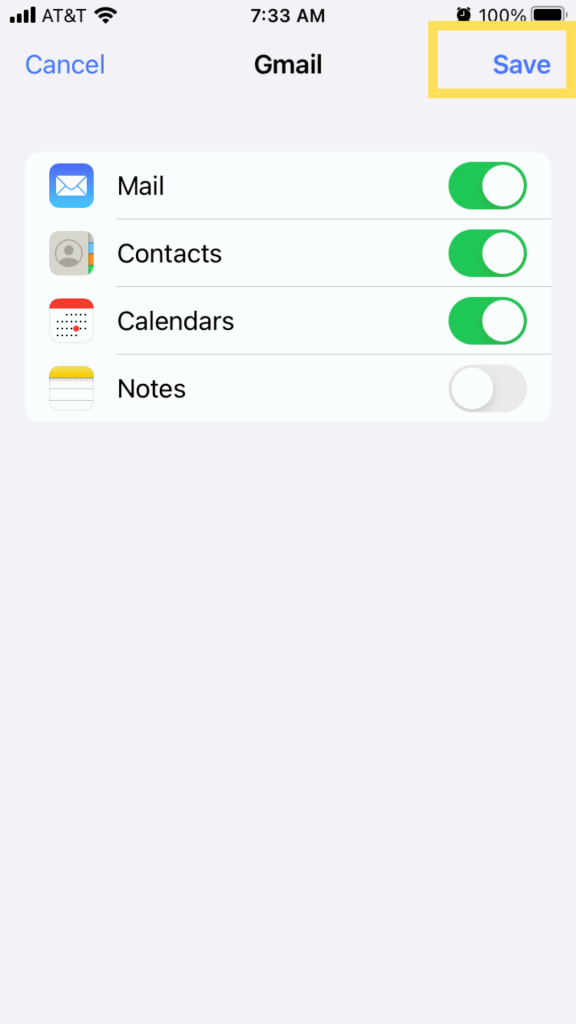
That's it...!
Now, anytime you launch the Mail app, your email will be there, and you are connected whenever and wherever.
This article will guide you through claiming a business page that is listed in the Experience section of your profile.
Step 1: Find the organization's page
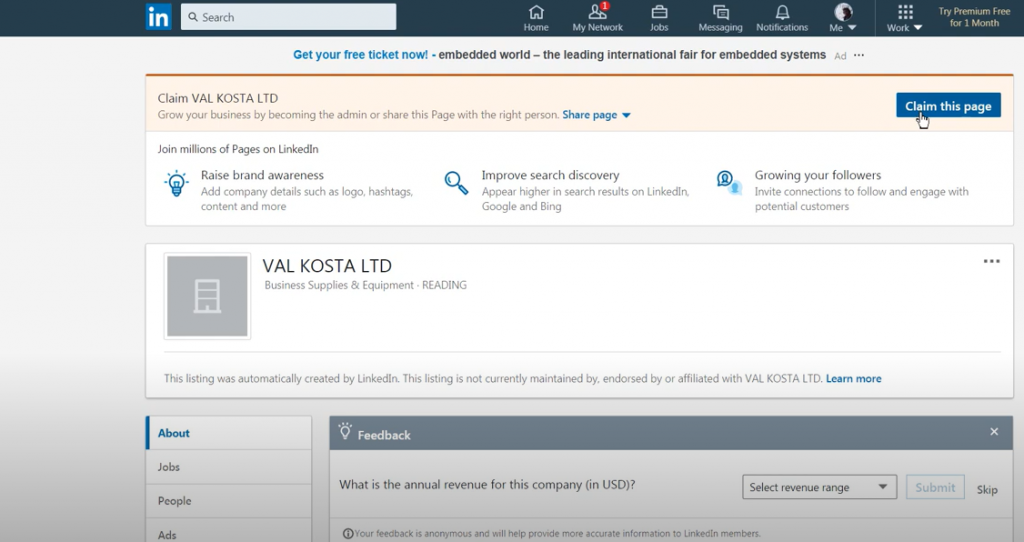
Click "Claim this page" at the top right corner and check the box to verify you're an authorized representative of the page
Step 2: Click "Confirm" and this will take you to the Admin view of your page
This article will guide you through the steps of adding a user as an additional "Owner" on the Google My Business platform.
Step 1: Login to your Google My Business dashboard
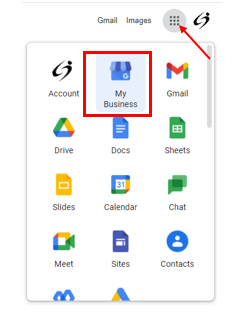
Access the icon with dots at the top right corner of the page and select the icon named "My Business"
Step 2: Once on the dashboard, find your business, and click "See your profile"
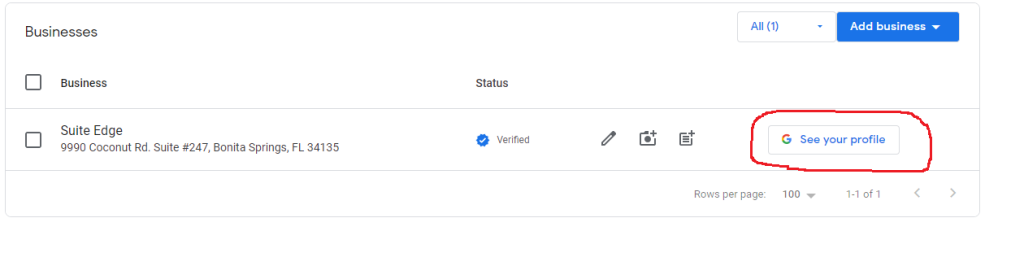
Step 3: Click on the 3 dots & Select "Business Profile Settings"
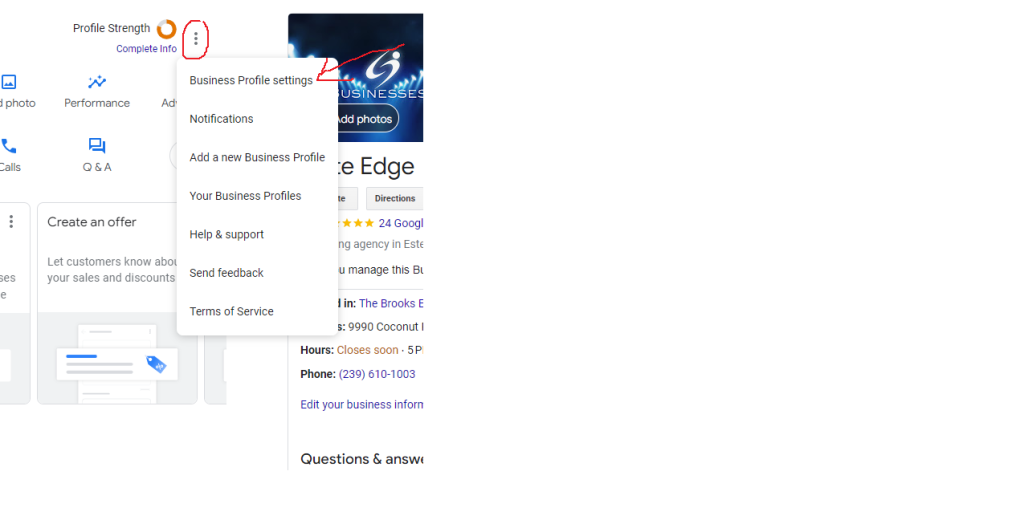
Step 4: Click on "Managers" then "Add" Type in the Email "ClientServices@SuiteEdge.net" and select "Owner"
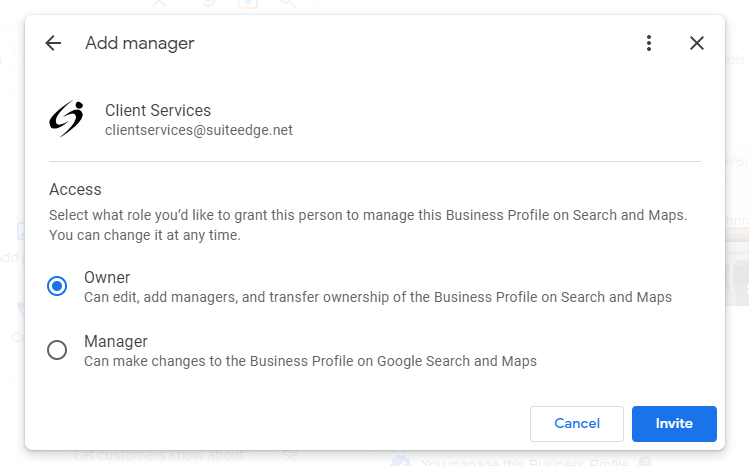
Step 5: Before clicking "Invite", please make sure that "Owner" is selected
Step 6: Click "Invite"
The following instructions will help you add a new role to your business page, for example, an additional administrator.
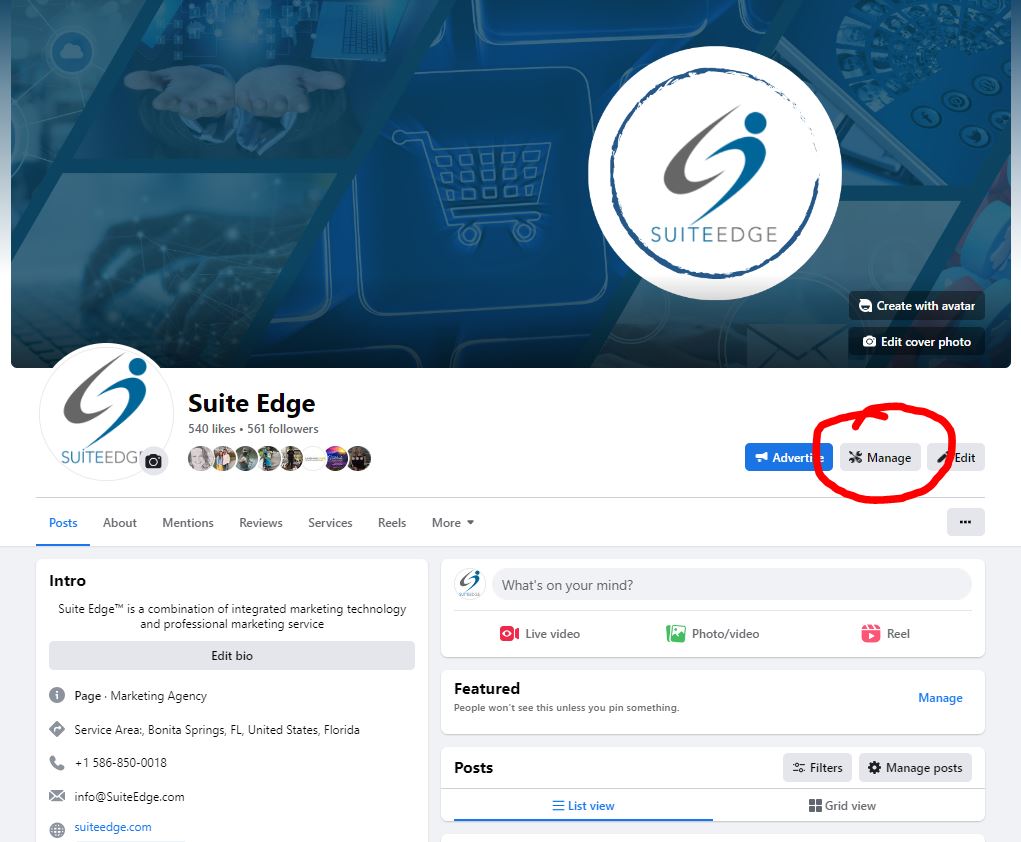
Step 1: Go to your business page, switch role's at your business and select "manage" underneath your main banner
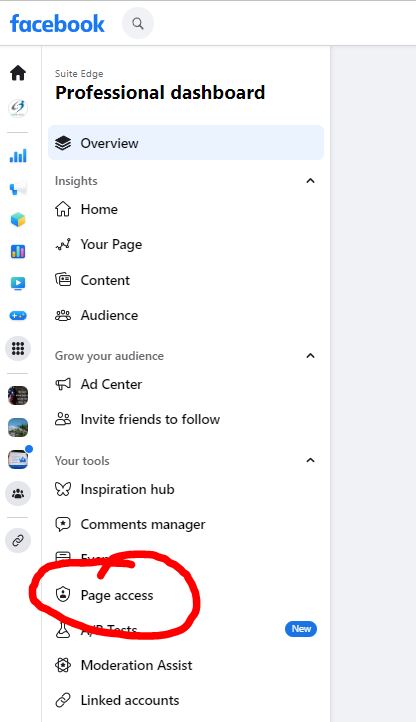
Step 2: Once in Settings, scroll on the left-hand side menu until you find Page Roles
Step 3: Type the name of the person needed under "Assign a New Page Role"
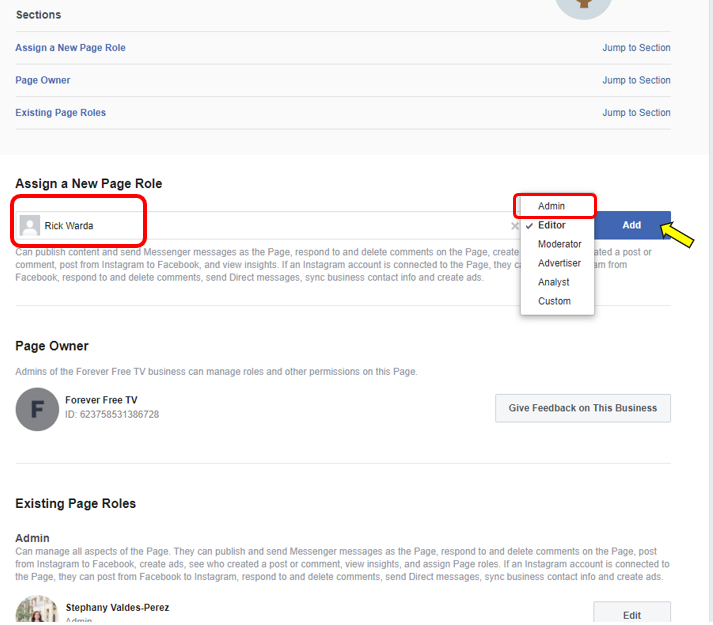
This will bring up search results, select the correct person and edit their permissions to either Admin, Editor, or other, then select "Add"
You will need to have a Business Pay Pal Account to accept payments or donations on your website
Step 1: Log into your PayPal account.
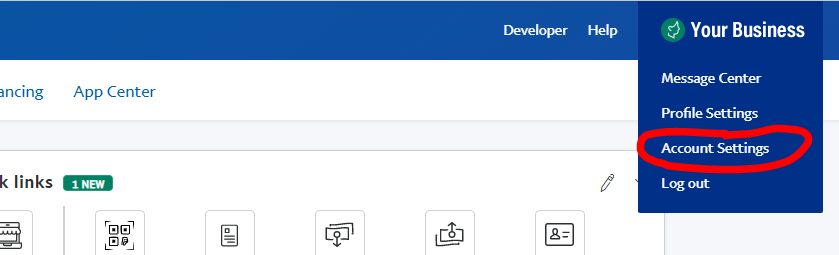
This should take you to an area where you can add the customer’s information.
Step 2: Go to Website Payments + Instant Payment Notifications, Click the Update Button
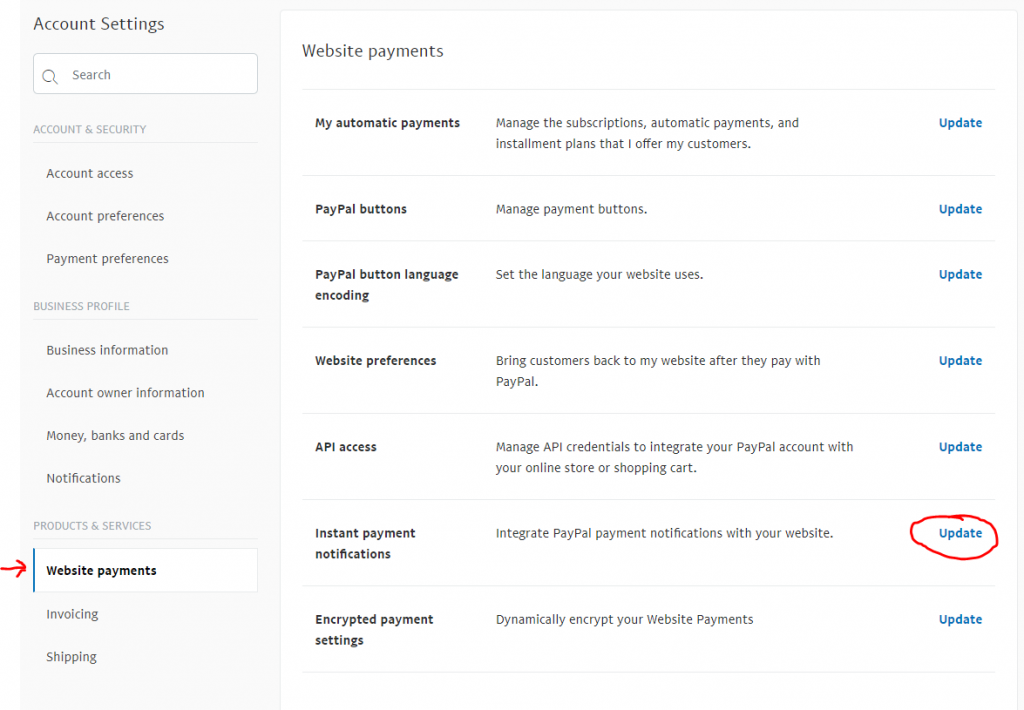
Fill out all the relevant info for the customer.
Step 3: Click the Choose IPN Settings button
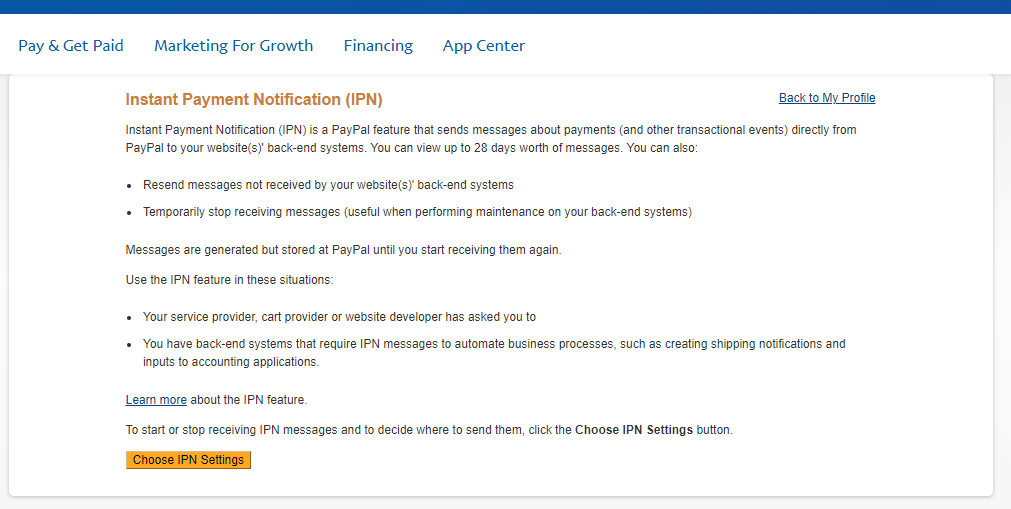
Step 4: Enter your website URL, select Receive IPN messages (Enabled) and hit Save.
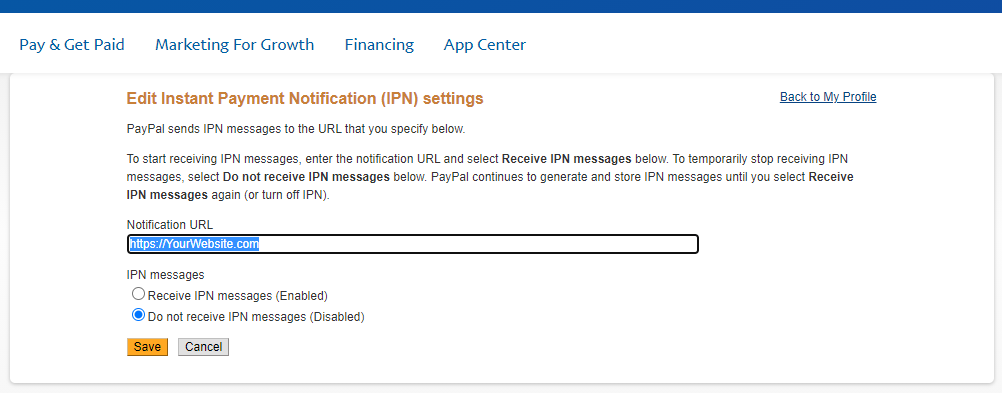
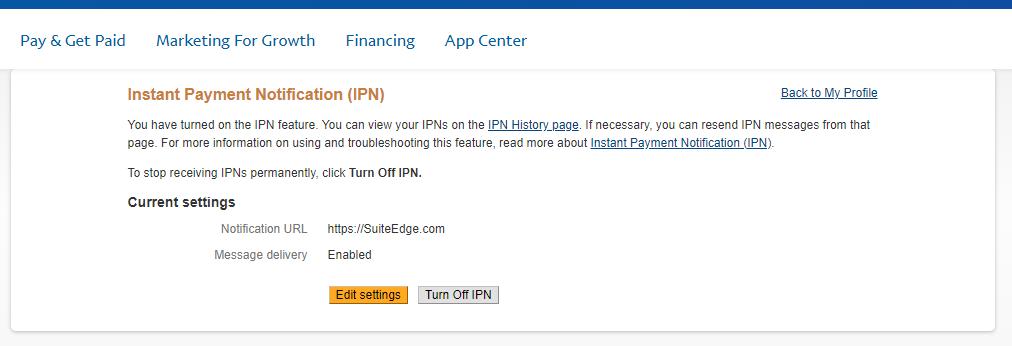
Your PayPal Instant Payment Notifications are now configured properly
Tax-exemption for certain customers is a common feature in eCommerce. Here's how you can add a Shopify customer account that doesn't pay taxes when checking out.
Step 1: Add A New Customer

On the Shopify Customers screen, click on “Add customer”.

This should take you to an area where you can add the customer’s information.
Step 2: Enter All Relevant Information

Fill out all the relevant info for the customer.
Step 3: Uncheck "Collect tax"

When you get to the Tax Exemptions section, make sure “Collect tax” is unchecked.

Save the customer. This will take you to an area where you can view and edit the new customer’s data.
Step 4: Send An Account Invite

Once you’re on the customer’s area, click on “Send account invite” to send the customer a link that lets them set up their own password and activate the account.

Click on "Review Email".

The popup will now show what the customer will see when they get the invite email. If everything looks good, click “Send notification”, and the email will get sent to the customer.

That’s it! Now the customer will get a link to set up their new tax-exempt account.